
Overview & Inspiration
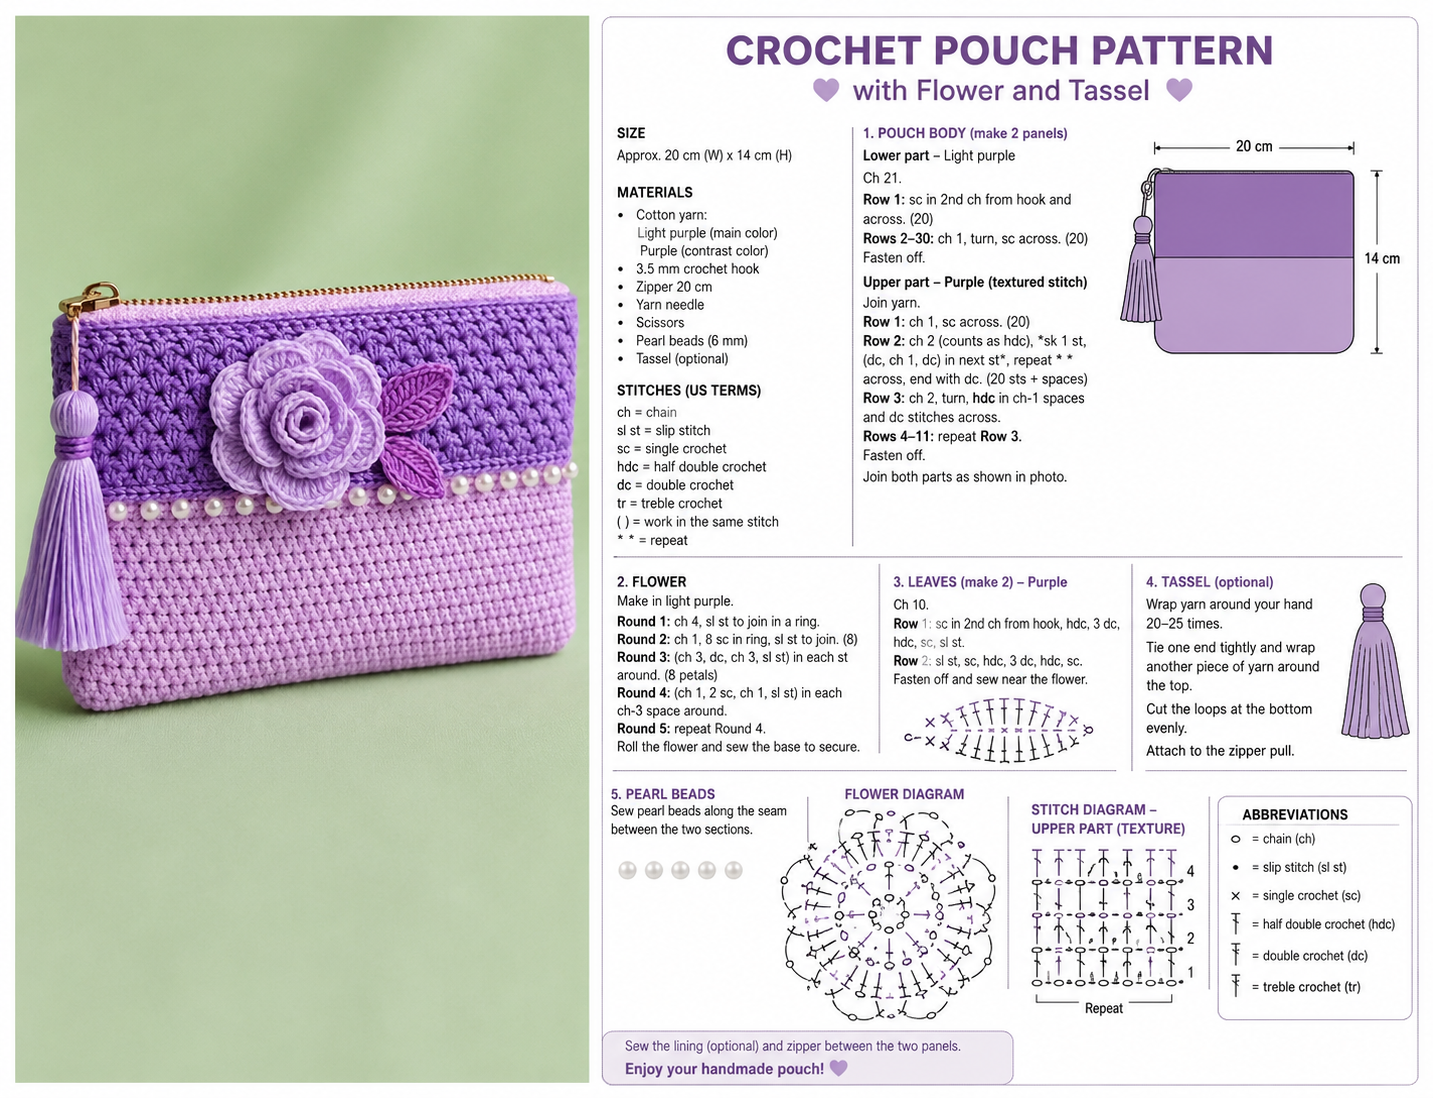
Welcome to the FreeCrochet community! Today we are sharing a gorgeous Crocheted Zippered Case decorated with a handmade rose, leaves, pearls, and a tassel.
This pouch combines practical storage with elegant embellishments. Customize it as a cosmetic bag, pencil case, or thoughtful handmade gift.
Materials & Tools Checklist
- Medium-weight cotton or cotton-blend yarn in two coordinated purple shades (approx. 100–150 g total)
- Appropriately sized crochet hook
- Zipper matching the final pouch width
- Sewing needle and strong matching thread
- Scissors and yarn needle
- Stitch markers and decorative craft pearls
Pattern Stitches & Abbreviations
- ch = chain
- sl st = slip stitch
- sc = single crochet
- hdc = half double crochet
- dc = double crochet
- tr = treble crochet
- st / sts = stitch / stitches
- sk = skip, yo = yarn over
- inc = increase, dec = decrease
- FO = fasten off
Step-by-Step Instructions
- Lower Panel: Foundation chain 45–55 ch (approx. 22–24 cm long). Row 1: sc in 2nd ch from hook and across. Ch 1, turn. Row 2: 1 sc in each st across, ch 1, turn. Repeat until light section measures 8–9 cm high.
- Upper Section: Change to darker purple. Ch 1, turn, sc in first st, then alternate a slightly raised stitch and sc across for 6–7 cm. Make a second identical panel for the back.
- Joining: Place both pieces together with right sides facing out. Join sides and bottom using sc evenly through both layers, leaving the upper edge open. FO and weave in ends.
- Zipper & Pearls: Center and pin the closed zipper along the upper opening, then sew securely with matching thread. Sew decorative craft pearls along the transition line between the two yarn colors, spacing them 0.5–1 cm apart.
- Crochet Rose: Ch 45 with lighter flower color. Work base row of sc across. For petals, work repeating combinations of (sl st, 5 dc, sl st) in next sts, using 7 dc for larger petals near the end. Roll tightly into a rose shape and secure with the yarn tail.
- Finishing Touches: Sew the finished rose and crochet leaves slightly off-center on the front panel overlapping the pearl line. Attach your handmade tassel near the zipper pull.
Assembly & Finishing
Check all your attachments to ensure the pearls, rose, and zipper are securely stitched. Gently shape the corners of your pouch and press the petals outward for a stunning dimensional finish.
Pro Tips for Best Results
- Keep your crochet tension firm so the pouch naturally holds its rectangular shape without sagging.
- Open and close the zipper multiple times during sewing to ensure the yarn never catches in the teeth.
- Secure the pearls individually with strong thread so a single loose stitch will never ruin the entire decorative row.
📄
Crocheted Zippered Case, Decorated with a Rose, Leaves, Pearls, and a Tassel Pattern – Printable PDF Pattern
Download the clean, printer-friendly PDF to work on your project anywhere offline.